17 September 2010

etsy loves

I think it's just about that time to share another list of Etsy Loves <3  Don't you?

1.  I am completely in love with these amazing prints from this cute shop :)


I am thinking they would look adorable in a sweet little girl's nursery :)

2.  this cutie pie plaque from here


3.  how about a little box of positivity from here??


4.  a "create happiness" pencil pack from here :)


5.  This Heather Ross fabric bundle from here!!


6.  These amazing dress up dolls which are actually reusable wall decals!!  You can get them here :)


Yikes yikes yikes!! Too much cuteness :)  I have so many favorite things right now!  There are so many insanely creative people out there!
xo
janel

16 September 2010

another goal accomplished!

 Good Morning loves!!
Happy Thursday which means almost Happy Friday!
This Friday is super exciting because I get to hang out with my friends, Jamie, Lehua, and Margot! eeek!  Plus, I get to meet some new friends as well :)

AND...
go here to create your own font!!!
p.s. you make me happy when skies are gray :)
xo
janel

14 September 2010

Fall Wreath DIY

Every season I like to create a new wreath to add to my welcome area at home :)  This year, I tried to think of something that I could create easily and on the cheap but still be cute and original.
After making a ton of tissue paper pom-poms for my art classroom, I decided how cute would a wreath made out of these be?? Answer...soooo cute!!
So, here is a little DIY tutorial for all of you to use if you would like :)

Materials needed:  
* 1 wire hanger
*   red tissue paper
*   yellow tissue paper
*  orange tissue paper
(obviously, all of those colors could be substituted to fit what you want :D)
* masking tape
*  tie wraps/wire

Step One-  Cut your sheets of tissue paper 6 inches square and make piles of your tissue papers in the like colors. 

Step Two- Gather eight sheets of one color of tissue paper (for this tutorial I will be using orange for my example).  Stack the 8 pieces of orange tissue paper on top of each other and begin to fold it like a paper fan :)


Step Three-  Secure your "fan" with a twist tie/piece of thin wire in the middle.


Step Four-  Use your scissors to round the edges of your "fan."  This will give it a beautiful scalloped look when you are finished with it.


Step Five- Repeat steps 1-4 with 9 different stacks of tissue paper.


Step Six- Lay your "fan" on it's side and "fan out the edges to look like so:


Step Seven-  Pull one layer of tissue paper up at a time and pull it towards the middle while you are doing it...


Step Eight-  Continue to pull up each piece of tissue paper, layer by layer until you get a large, poofy tissue paper flower :)


Step Nine-  Continue to turn each of your "fans" into tissue paper flowers!


Step Ten-  Stretch your wire hanger out to create a circular shape for your wreath base :)


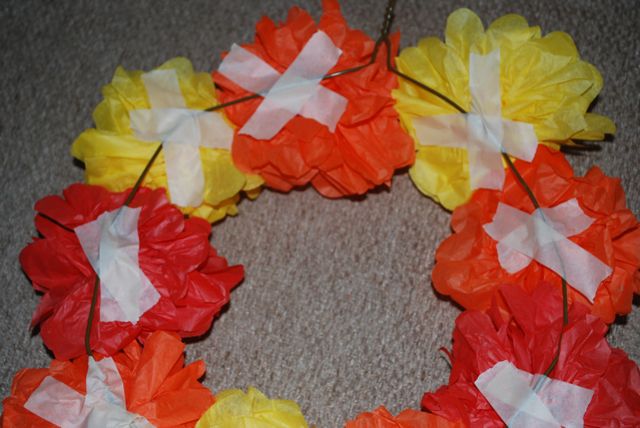
Step Eleven-  Use the masking tape to adhere the tissue paper flowers to one side of your hanger.  I formed an "x" with the masking tape so that each one is held on firmly!


Step Twelve- Flip it over and admire your work!!! You now have an adorable, affordable, DIY, cutie pie Fall Wreath to help you welcome the loveliest of all seasons!


Step Thirteen-  The best part about using a wire hanger is now you have a perfectly easy, already made, hanging hook.  Hang your wreath and enjoy!!


Remember you can use any color of tissue paper and use this wreath for any occasion that you would like!! If you decide to create one of these wreaths yourself, please link it to me so that I can check it out!!  You can also add a photo of it to the Run With Scissors Flickr group!! I would love to share some of your creations on my blog!!
Have fun!!
xo
janel

30 before 31: checking in

This weekend I was able to check THREE things off of my "30 before 31" list!  I thought now would be a great time to check in and share all of the goals that I have accomplished so far in 5 months :)  I still have plenty of time to get the rest completed.


I ran out of room so I had to stop writing all of the books that I had read :)  12 was way too small of a goal for that one.

one more to go!


There are some other ones that are almost complete, or in the process of being completed :)  There are some other goals that I have no desire to do anymore too.  What do you do when you find you are kind of "over it" on some of the goals that you made a while back?
Here is my complete list that I made on my birthday, April 5.

I must say, I adore this little mini-album :) It's such a great way to document all of your accomplishments.  love.
Have a great Tuesday friends!
xo
janel

13 September 2010

Renegade Pressies

**edited: photobooth pics are at the bottom of this post :)
Obviously, everything at Renegade was beautiful :)  The crafters put so much into their work, it blows me away.  I had to do a really good job with practicing self-control when it came to the buying part of the trip.  I found myself, in many a booth, saying "I need that!"  I definitely have some new super favorite artists (as you will see below).  I took one big picture of everything I got at Renegade and number the items.  The number of the item, will correspond to the shop/blog link of the artist it was purchased from :)

1- As you can see, I was in love with pretty much everything in this shop!!  June craft is pretty much going to be all over Pita's nursery :) xo
2-  This is the other booth that literally stole my heart.  I wanted to buy every single thing here.  It was my favorite!! Her hand crocheted goods were flawless and super affordable.  Plus, she sold lavender bunches too!! love love love TartHeart!
3-  This stationary bundle from Shy But Interested was so perfect for me.  Not only are they  gorgeous, and fall-ish, but hello! they talk about the love for pumpkin pie!!  love.
4- Urban Posture was super cute as well.  Their screen printed designs are gorgeous!  i love the wooden brooch so much and the tea towels are going to be put to good use very soon!
5-  Overdue Industries was full of these old library books, turned journals.  There were sooo many to choose from and I had a ton of favorite but finally narrowed it down to the children's book Ella.  The cutest part is that there is a library due date card that they stamped when they made it and then stamped again when the book was purchased.  It is those sweet little details that make all of the difference :)
6-  I purchased a tiny little Renegade T-shirt for my someday :)  It was too cute to pass up! This was obviously from the Renegade booth.
7-  cute cute postcards from the lovely Katie at Skunkboy Creatures.
8- I can not even remember where I got this necklace and it's bumming me out :(  I love it so much! It's a locket with an anchor on the front.  If anyone recognizes and knows which Renegade booth it was at, let me know please!!
9- I got a ton of cute free swag from the Etsy booth where we also made some adorable bunting crafts!!  Adam picked me up a cute tote bag there and a T-shirt (that I was wearing when this photo was taken)

Here are some close ups at some of my goodies :)  


I got loads of cute little button pins from different booths that were giving them away. (Sara K. if you are reading this...the PBR one is for you)!
One Up had this gum ball machine that you could put quarters in and it would give you a love token.  Adam and I both got each other a love token and both of our's said the same thing.  It was a super cute idea and I love my love token a lot!


The photobooth pictures were uploaded on the magbooth website!  Here they are:


I hope you are having a lovely day!
xo
janel